
Hqn091 - LDK tools and command-line application
Introduction
This technical note provides information about the LDK tools and utilities and the command line application, and applies to both the Harlequin MultiRIP (HMR) and Harlequin Core (HHR).
The LDK tool provides various options which enable product activation and upgrade, and is available as an easy‐to‐follow graphical user interface. The LDK command line application provides same options as the LDK tool but from a Windows command line or Linux terminal allowing OEM automation of the process.
These tools are provided to allow a smooth transition from the old HLS-secured to LDK‐secured RIPs.
The GetDongleInfo utility is provided for end users to gather information about their SuperPro dongle and RIP passwords when they want to swap from using HLS security to LDK security.
HLS licenses are secured against a hardware dongle, while most LDK licenses are expected to be soft‐locks (secured against the computer hardware) or VM‐locks (secured against characteristics of the VM image in which they are run).
Global Graphics has implemented systems to create LDK clones of pre‐existing HLS licenses to allow users to upgrade from an older RIP version to a new version secured with the LDK. Initially these system required that the old HLS dongle be returned to Global Graphics, but in some cases this can prove difficult. Global Graphics has, there‐ fore, provided the DisableDongle tool which can disable Harlequin HLS dongles in the field and produce a certificate file. Global Graphics will accept a certificate file as equivalent to the dongle having been returned.
For more information see the documents entitled "LDK Security for Harlequin MultiRIP 10" and "Sentinel LDK Security for the Harlequin Host Renderer".
Delivery
The LDK Tool, command line utility, GetDongleInfo (HMR only) and DisableDongle are all provided in the ldk/utils directory.
Note: On Linux you will see a file called LdkToolApp. This file contains the resources for the LDK Tool and is not a user file.
Note: The GetDongleInfo and DisableDongle tools can be shipped separately from a RIP.
The LDK tool
The LDK tool provides various options which enable product activation and upgrade, and is available as an easy‐to‐follow graphical user interface.
Prerequisites
The Sentinel LDK runtime environment should be installed on the HMR/HHR computer before you can use the LDK tool.
Using the LDK tool
To display the LDK tool.
On Windows Select LDK registration from the Start menu.
Assuming a default install on Windows go to *\users\<name>\<product_xxx>\ldk\utils*
and double‐click ldktool.exe.
Where <product_xxx> is your HMR/HHR name.
On Linux, as long as the HMR/HHR is installed as "superuser", go to
/usr/local/bin/<product_xxx>/ldk/utils/ and double‐click ldktool.
If this is a new install the "new" install dialog is displayed: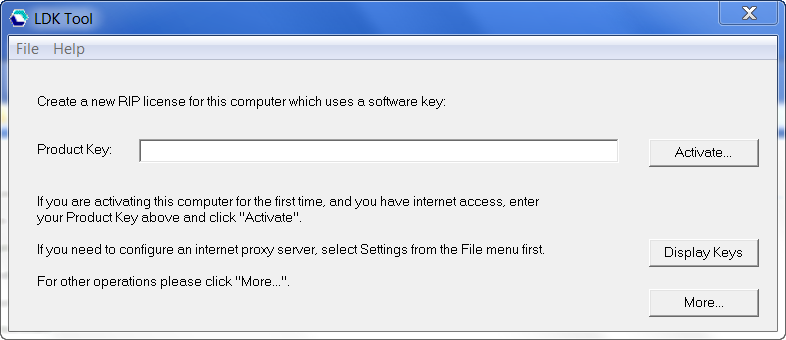
If this is an upgrade to a previously existing RIP the "add options" LDK tool is displayed: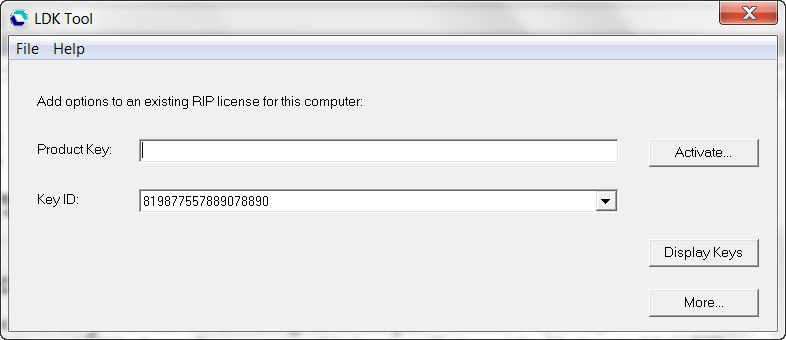
When using the LDK tool pay close attention to the screen instructions because messages are displayed at each step of the procedure.
Activate
If you have a new key to add new options to your RIP for this computer enter it into the Product Key window and click Activate.
You can select another Key ID using the down‐arrow in Key ID window.
Note: A Product Key always contains 36 characters and hyphens. For example: cfdd15d0‐2737‐4fe0‐a58c‐2604f9d232d9. Once activated, each activation can be identified using a Protection Key ID. The length of the Protection Key ID varies, but is shorter than 36 characters, and contains no hyphens. For example: 642071562632548406. There are two numbers because the Product Key references the order (entitlement), whereas the Protection Key ID(s) references the activated license(s). A single entitlement may enable more than one activation.
Display Keys
Allows you to display further information about the various keys you have. By selecting a key in the displayed list, information about that key is displayed in the lower area of the dialog
More..
Displays the full list of options: 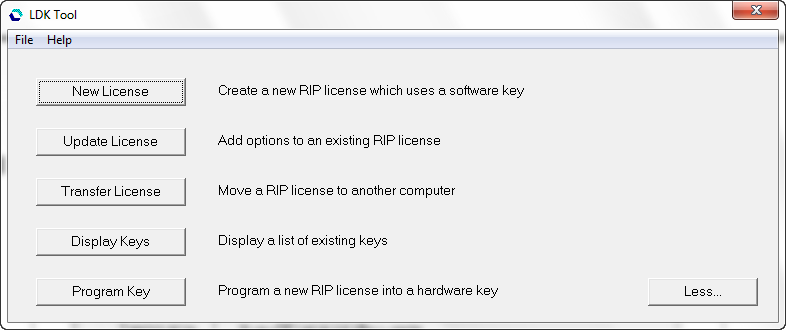
When using the LDK tool pay close attention to the screen instructions because messages are displayed at each step of the procedure.
Menu options
File > Settings
You can choose to use the proxy server settings from Internet Explorer (the default setting) or use a manual configuration or None. When using a manual configuration (or None) you should contact your system administrator for full details. When using a manual configuration you have the option to authenticate a user name and password.
File > Language
This option allows you to select another language for the LDK tool.
When the language is changed the LDK tool will quit (with exit status 44). The tool must be re‐started to switch languages. When required, the installer can be forced to run in a particular language.
File > Exit
Use this option to exit the LDK tool.
Help > About LDK Tool
Use this option to view information about the LDK tool.
LDK tool options
New License
Allows you to License a new HMR/HHR.
Update License
Allows you to upgrade a HMR/HHR.
Transfer License
Allows you to transfer a license from one machine to another.
Display Keys
Allows you to display further information about the various keys you have. By selecting a key in the displayed list, information about that key is displayed in the lower area of the dialog.
Program Key
Allows you to program a dongle.
Less...
Displays the reduced list of options.
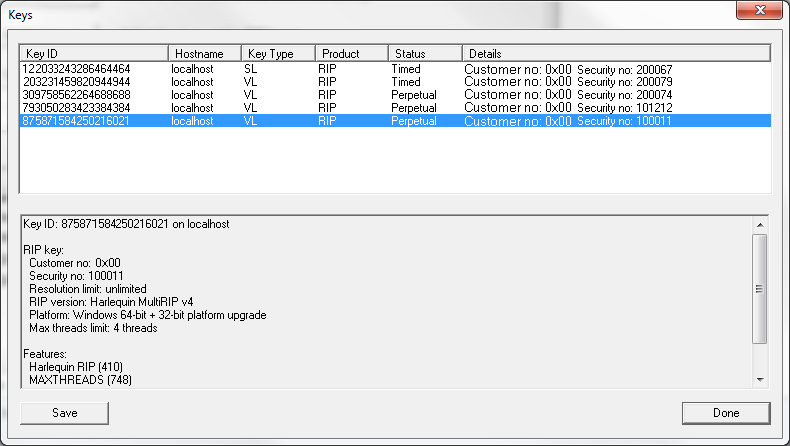
In this example you can view a Customer number, Security number, Resolution limit, RIP version and the Maximum number of threads allowed.
To save information about all of your keys to a text file select
Save. A keyDetails.txt file is saved to disk.
The LDK command line application
The LDK command line application provides various options which enable HMR/HHR activation and upgrades from a Windows command line or Linux terminal.
This command line option is supplied as an alternative to the LDK Tool for use where an OEM wishes to script processes instead of using the UI.
Prerequisites
The Sentinel LDK runtime environment should be installed on the HMR/HHR computer before you can use the command line application.
Options and arguments
Note: On Linux commands are preceded with ./ (dot slash). For example:
>./ldkutil
To view help for the utility:
- Open a command or terminal window.
- In the window do:
>cd <product_xxx>\ldk\utils\3. To display help information enter:
>ldkutilThe following information is displayed as part of the help:
ldkutil [ -proxy <proxyserver> ] [ -proxyuser <user:password> ] [ -server
<emsserver> ]
	[ -timeout <secs> ][ -quiet ] [ -v ]
	[ -apply -i <v2c> | <h2h> ]
	[ -fingerprint [ -hl | -sl ] [ -o <c2v>] ]
	[ -initial <productKey> [ -hl | -i <c2v> | -sl ] [ -o <v2c> ] ]
	[ -recipient -o <c2v> ]
	[ -transfer <keyId> -i <c2v> -o <h2h> ]
	[ -update <productKey> -keyid <keyId> [ -o <v2c> ] ]
Where:
<v2c>
Vendor‐to‐Customer file that contains data to update a Sentinel protection key on the end user's computer. This data can include detailed changes to the license terms or data to be stored in the end user's Sentinel protection keys.
<c2v>
Customer‐to‐Vendor file. A file sent by the customer to the vendor, containing data about deployed Sentinel protection keys or data about the customer's computer.
-apply
This applies a <v2c> file to create a software key or update an existing key, or applies an <h2h> file to complete transfer.
c = customer v = vendor h = host.
-fingerprint
Gets a fingerprint for initial activation. A fingerprint is a hash value derived from the characteristics of the computer, including its hard drive serial number and motherboard ID.
A Sentinel SL key is tied to this fingerprint when it is created, and a protected application wonʹt run if there is a mismatch between the computerʹs fingerprint and that stored with the key. Either the hard disk serial number or motherboard ID may be changed, but not both at once. For example, to create a <c2v> file use:
>ldkutil -fingerprint -sl -o <c2v>
You can achieve the same by using the Admin Control Center tool and selecting Diagnostics and clicking the Create ID File button. A file called <machine name>.id is created in the download folder.
-initial
Is used for the initial activation using a product key, applying an update to a key or writing to a <v2c> file.
-recipient
Gets fingerprint as recipient for software key transfer.
-transfer
Allows a software key to be transferred to another machine.
Use -recipient to obtain a <c2v> file on recipient, and then pass that in using -i. If you attempt to transfer a key which is in use, the transfer will fail and display an error. Therefore, before attempting the transfer ensure no RIP is using the key.
-update
Allows you to activate and update using a product key, apply an update to a specified key or write to a <v2c> file.
Use the following arguments as appropriate:
-v
Generates verbose output.
-sl
Creates a software key on initial activation, or gets a fingerprint for a software key.
-hl
Creates a hardware key (dongle) on activation, or gets a fingerprint for a hardware key (not currently supported).
-keyid
Use the protection key ID. You can find this in the Sentinel Admin Control Center.
-i <file>
Used to specify the location of the input file, such as when applying a <v2c> file.
-o <file>
Used to specify the location of the output file, such as when generating a <c2v> file.
-proxy <proxyServer:port>
Used to specify a proxy server.
-timeout <secs>
Allows you to specify a timeout in seconds for http operations.
The default is no timeout.
-quiet
Quiet mode for fewer messages.
-server <server:port>
This option should not be required.
-proxyuser <user:password>
Used to specify authentication for the proxy server.
Using the LDK command line application
License new HMR/HHR—software protection
- Make sure you have received your HMR/HHR key from Global Graphics.
- Make sure you have an internet connection.
- Install the HMR or HHR. For detailed instructions on how to do this see the HMR or HHR installation manual.
Note: The Sentinel LDK runtime environment should be installed on the host computer before generating a fingerprint or transfer recipient file for it. For more information on the Admin Control Centre see the documents entitled "LDK Security for Harlequin MultiRIP 10" and "Sentinel LDK Security for the Harlequin Host Renderer".
Note: If host machine does not have web access you must copy the ldktool located at
/ldk/utils/ onto a machine with web access.
- Open a terminal or command window and cd to /ldk/utils/.
- If the machine running the HMR/HHR has web access, activate your products using:
>ldkutil -initial <productKey> -sl
This creates a local key assigning your products to the machine.
- If the machine running the HMR/HHR does not have web access, do the following to activate your products. On the HMR/HHR machine create a fingerprint file using:
>ldkutil -fingerprint -sl -o <machine name>.fingerprint.c2v
Move the c2v file, using a network or memory stick, to a machine with web access, then on the machine with web access use:
>ldkutil -initial <productKey> -i <machine name>.fingerprint.c2v
-o <machine name>.license.v2c
This creates a file containing the license details. Move the v2c file to the machine running the HMR/HHR and use:
>ldkutil -apply -i <machine name>.license.v2c- When completed an "Activation successful" message appears.
- To open the Sentinel Admin Control Center double‐click the shortcut located in
/ldk/utils/. Alternatively, start your browser and enter: http://localhost:1947![]()
The Sentinel Admin Control Center tool provides useful administration and control capabilities.
License new HMR/HHR—hardware protection
This procedure is only necessary if the dongle has not been programmed already.
- Make sure you have received your HMR/HHR key from Global Graphics.
- Plug your dongle into the computer running the HMR/HHR.
- Install the HMR/HHR. For detailed instructions on how to do this see the installation manual for your product.
Note: The Sentinel LDK runtime environment should be installed on the host computer before generating a fingerprint or transferring a recipient file for it. For more information on the Admin Control Centre see the documents entitled "LDK Security for Harlequin MultiRIP 10" and "Sentinel LDK Security for the Harlequin Host Renderer".
4. Open a terminal or command window and cd to /ldk/utils/.
5. Activate your products using:
>ldkutil -initial <productKey> -hl
The license is programmed into the connected dongle.
Upgrade HMR/HHR—software protection
Use this procedure if you want to add layered options or plugins to an already installed HMR/HHR.
- For HMR get the key ID from the Configure RIP > Extras dialog. For HHR get the key ID by double‐clicking the shortcut located in /ldk/utils/ to open the Sentinel Admin Control Center. In the Options bar at the left side of the screen select Sentinel Keys and note the Key ID.
- Copy the key ID.
- Paste the key ID into a file and send this to GGSL with a request for your upgrade or layered option.
- GGSL will send you a new product key <productKey>.
- Make sure you have an internet connection.
- Quit the HMR/HHR.
- If the machine running the HMR/HHR has web access, activate your upgrade product using:
>ldkutil -update <productKey> -keyid <KeyID>.v2c8. If the machine running the HMR/HHR does not have web access, do the following to upgrade your products. On the machine with web access and the Sentinel runtime environment do:
>ldkutil -update <productKey> -keyid <KeyID> -o <v2c>
This creates a v2c file. Move this v2c file to the machine running the HMR/HHR and use:
>ldkutil -apply -i <KeyID>.v2c9. When completed an Activation successful. Key updated message appears.
Upgrade HMR/HHR—hardware protection
Use the procedure described in Upgrade HMR/HHR—software protection if you want to add layered options or plugins to an already installed HMR/HHR.
Transfer HMR/HHR license from one machine to another—software protection
This section describes how you can transfer a license to another machine. This is useful if, for example, you have purchased a new more powerful machine and want to move your HMR/HHR to it.
- Install the HMR/HHR onto the new machine.
- On the older machine get the key ID by double‐clicking the shortcut located in
/ldk/utils/ to open the Sentinel Admin Control Center. In the Options bar at the left side of the screen select Sentinel Keys and note the Key ID.
3. Close the HMR/HHR.
4. On the new machine create a recipient file by using:
>ldkutil -recipient -o <KeyID>.c2v5. Copy the c2v file to the computer currently running the HMR/HHR—the source computer. Then use:
>ldkutil -transfer <KeyId> -i <KeyID>.c2v -o <KeyID>.h2h
where <KeyId> is the key ID, c2v is the recipient file you previously created and h2h is a new file you will create.
6. Now move the h2h file to the new recipient machine.
7. On the recipient machine apply the transfer file to this computer by using:
>ldkutil -apply -i <KeyID>.h2h8. A Key Transfer Successful message will appear.
The HMR/HHR will now run on the new machine and will not run on the older machine.
Note: This procedure transfers the entire key. That is, the HMR/HHR license, any layered options and plugins.
Transfer HMR/HHR license from one machine to another— hardware protection
To transfer a license from one machine to another simply move the dongle to the new machine; no re‐programming is required. This is useful if, for example, you have purchased a new more powerful machine and want to move your HMR/HHR to it.
Note: This procedure transfers the entire HMR/HHR. That is, the HMR/HHR license, any layered options and plugins.
The GetDongleInfo and DisableDongle utilities
The GetDongleInfo utility is provided for HMR end users to gather information about their SuperPro dongle and RIP passwords when they want to transition from using HLS security to LDK security.
Currently, OEMs are free to migrate users from HLS to LDK as required. However, sup‐ port for HLS is planned to be dropped from HMR v 11 hence migration to LDK will be required.
This DisableDongle utility is used to disable the dongle and create a certificate file which Global Graphics will treat as the equivalent to the receipt of the physical dongle.
Anticipated workflow
The workflow to transition from an HLS license to an LDK license (possibly in conjunction with a RIP upgrade) for which Global Graphics is designing and providing these utilities is as follows. We welcome input and suggestions if this does not align with your requirements.
- The GetDongleInfo utility is used to harvest details of an existing HLS license. This is done on the computer where the HLS‐licensed RIP is running.
- The .superpro file created by GetDongleInfo is uploaded into the Merlin web site at Global Graphics by the OEM's ordering team (alternatively it can be sent to Global Graphics' sales admin with an order).
- The appropriate 'target' LDK part number is selected from those presented by Merlin
- Merlin creates a Product Key for the LDK‐secured RIP.
- Merlin automatically provides an RMA number for the HLS dongle to be returned and records it in Global Graphics' database.
- The LDK Product Key is activated on the computer on which the new LDK‐ secured RIP will be used.
- The end user performs whatever acceptance process is required.
- The DisableDongle utility is used to disable the original HLS dongle, and to create a certificate file. This may be done on the computer where the old HLS RIP had been run, but could equally be done on any other machine that fulfils the prerequisites listed above, for example, on a dealer site.
- The certificate file created by DisableDongle is delivered to Global Graphics in lieu of returning the physical dongle. For the moment that return should be by e‐mail; we anticipate adding the capability to upload it into Merlin at some point in the future.
- Global Graphics will treat receipt of the certificate file as equivalent to receipt of the physical dongle.
- Once the certificate has been sent by the end user, the dongle should be physically destroyed.
Using GetDongleInfo
The GetDongleInfo utility is straight‐forward to use.
Double click getdongleinfo.exe. It reports if it can find a SuperPro dongle, and if it can it displays a prompt to locate the RIP's SW folder followed by a prompt for a location to save its results file. The resulting .superpro file can then be used to request an appropriate LDK license by uploading it to Merlin as part of an HLS2LDK order. That license will enable the same features as in the original RIP, and use the same security number.
Note: The file name for the .superpro file is constructed from the dongle serial and security numbers.
As an aid to users a PostScript language wrapped version of the GetDongleInfo tool is provided in the /ldk folder. This allows you, the OEM or dealer, to send the getdongleinfo.ps file to a user (for example by using a USB data stick). When the getdongleinfo.ps file is printed through the RIP the following message appears:
Select OK and the serial number of the dongle is displayed.
Click OK once more and a message displaying the location of the .superpro file is dis‐ played. The .superpro file is generally written to the same location as the getdongleinfo.ps file.
Using DisableDongle
This section describes the DisableDongle utility which is used to disable Harlequin HLS dongles when performing a transition from HLS to LDK‐secured RIP.
Note: Once disabled, a disabled dongle cannot be reactivated in the field. Before attempting to use the utility ensure the prerequisites are met.
Prerequisites
Before the DisableDongle utility can be used the SafeNet SuperPro dongle drivers must be installed. In addition to this the Sentinel LDK runtime environment must be installed which also installs the Sentinel LDK License manager, run as a Windows service or as a daemon on Linux. When the Sentinel LDK runtime environment is installed the Admin Control Center, a web‐based control application, becomes available.
SafeNet SuperPro dongle drivers
If the dongle is being disabled on the computer on which it has previously been securing a Harlequin RIP these drivers will be in place already. If they are not, they have been supplied with Harlequin RIPs for many years and can easily be installed.
Sentinel LDK runtime environment
When the Sentinel LDK runtime environment is installed as part of an LDK secured RIP installation, the Sentinel LDK License server, run as a Windows service or as a daemon on Linux is installed.
If you did not install the RIP on Linux as superuser, see Installation and licensing an evaluation (Linux) for information on how to install and start the runtime.
When the Sentinel LDK runtime environment is installed the Admin Control Center, a web‐based control application, becomes available.
The Sentinel LDK license server must be installed and running either on the same computer that the dongle is being disabled on, or somewhere on the same subnet of the same network. Also, a Global Graphics LDK product key must have been activated on that server prior to using DisableDongle. The activated product is of no consequence, that is, it can be for any LDK-secured product.
If the Sentinel LDK License server is not on the same computer as the dongle, the LDK runtime must be installed on that machine.
This condition is fulfilled in either of the following cases:
- A new LDK‐secured RIP has been installed and activated on the same machine as the old RIP and the dongle is being disabled on this same machine.
- A new LDK‐secured RIP has been installed and activated on a new computer, and that computer is connected to the same subnet as the old RIP computer on which the dongle is being disabled. The LDK runtime must be installed on the old RIP computer before using DisableDongle.
- The dongle is being disabled on a computer in a dealer's or OEM's offices and there is an LDK‐secured Harlequin RIP somewhere on the same network and the LDK runtime is installed on the machine on which DisableDongle is used.
If the Sentinel LDK license server is running on a different machine from DisableDongle, open the Sentinel Admin Control Center on the computer to which the dongle is attached and click through to the Configuration::Access to Remote License Managers dialog. Make sure that Allow Access to Remote Licenses, Broadcast Search for Remote License and Aggressive Search for Remote Licenses are all checked. With these selections made the remote license will be discovered automatically.
Tool usage
The usage is:
>DisableDongle [ -certify <serialNo> ] [ -disable <serialNo> ] [ -report ]Specify one of:
-certify <serialNo>
write file certifying that specified dongle is disabled
-disable <serialNo>
DisableDongle with specified serial number
-report
report details of any connected dongle
Both -certify and -disable require that you specify the serial number of the connected dongle, so as to guard against accidentally disabling the wrong dongle.
<serialNo> in the command line must be the dongle serial number, not the dongle security number (which, under HLS, becomes the RIP serial number).
With -report the utility reports the details of the connected dongle, for example:
>DisableDongle.exe -report

Disable Dongle Utility v1.1r0 Found supported SuperPro dongle:
	Customer no: 11: Security no: 63759-64: Serial no: 47917:
	Platform: Windows 32-bit
This dongle will enable Harlequin RIP v7, v8 and v9
An upgrade password is required to enable Harlequin MultiRIP v2, v3, v10

%This is the same as is reported in the License Manager and LDK Tool.
%With -disable the utility disables the dongle and then reports that it has been disabled, and the name of the "certificate" file:

>DisableDongle.exe -disable 47917
Disable Dongle Utility v1.1r0 Found SuperPro dongle:
Dongle serial no: 47917 Disabling dongle ...
Successfully disabled dongle: 47917

Generating disabled dongle certificate ...
Disabled dongle certificate written to: D:\swhope\trunk\spro2ldk\disableddongle47917.txt

PLEASE ENSURE THAT THE DONGLE IS PHYSICALLY DESTROYED ONCE RECEIPT OF THE CERTIFICATE HAS BEEN ACKNOWLEDGED
With -certify the utility just does the second part of this, having confirmed that the attached dongle has been disabled.
The certificate file, which is written to the current directory, contains:
>type disableddongle-47917.txt

Disable Dongle Utility v1.1r0 Dongle serial no: 47917
Original Customer no: 11: Original Security no: 63759-64 Dongle disabled on 2014-12-15 at 16:26 by theuser

0090 00FF 0012 DE63 AD7F 0047 00E0

TheUser2
2014-12-15 16:26:24
644EF63F0A4CDE76B1208D840774
3724646756
Where:
- the original values and Dongle disabled on ... are read from the dongle,
- TheUser2 is the login name of the user who generated the certificate (not necessarily the same as the earlier ʺtheuserʹ who did the disabling),
- 2014-12-15 16:26:24 is the date and time that the file was created,
- Other values are Global Graphics proprietary information. If a disabled dongle is connected -report reports:
>DisableDongle.exe -report

Disable Dongle Utility v1.1r0 Found disabled SuperPro dongle:
Serial no: 47917
Original Customer no: 11: Original Security no: 63759-64 Dongle disabled on 2014-12-15 at 16:26 by theuser
Detecting disabled dongles
If a dongle is reported as not working you can detect whether or not it has been disabled by:
- Using DisableDongle –report
- Using the Display keys option in the LDK Tool (from HMR v10.1r1 and HHR 4.1r1)
Note: The GetDongleInfo utility will refuse to record HLS license details if the attached dongle has been disabled.
Note: Once disabled, a disabled dongle cannot be reactivated in the field.