Hqn061 - Using Threshold Screens
Introduction
This document describes the process of creating, installing, encrypting and editing type 16 and type 5 halftones, to be used as threshold screens within the Harlequin RIP.
Type 16 halftone
A type 16 halftone is a halftone represented in a 16‐bit threshold array. Figure 1 below illustrates a 4 x 4 threshold screen, which can produce 4 different levels of gray, as well as white or black. 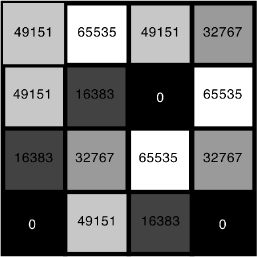
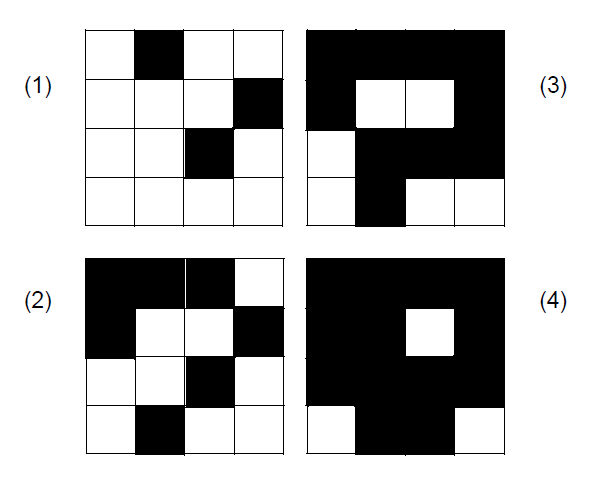
Figure 1 4 x 4 threshold screen
It may also be useful to consider the threshold array as a three dimensional surface, as illustrated in Figure 2.
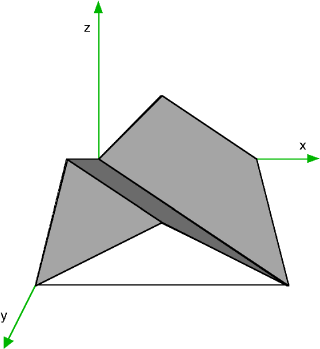
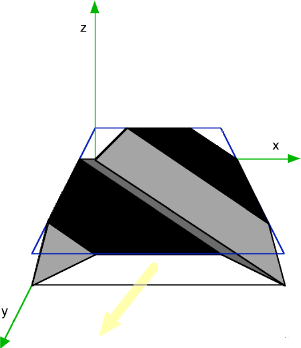
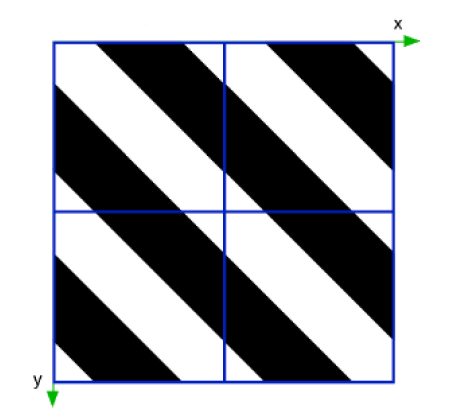
Figure 2 Example of a threshold array represented as a 3D surface
Essentially, the 3D surface in Figure 2 is like a folded sheet of paper that represents the different levels of threshold values. The 3D surface is cut by a flat plane through the z‐ axis to produce the output screen at a particular tint (as shown in the second part of Figure 2). The higher (upwards) the z axis value, the fewer pixels that are white, which means the tint will be lighter. For example, to produce a 50% tint, the flat plane must cut halfway through the z‐axis, as shown in the second part of Figure 2.
The x and y axis represent the x and y axis of the threshold screen, as represented by the third part of Figure 2.
Creating the screen file (tile)
The type 16 halftones described in this document come from threshold files, that we will simply refer to as tiles. These tiles can be created by a number of sources, such as Photoshop. The requirements of the tiles are:
- 16‐bit (unsigned short).
- Big‐endian (Macintosh/UNIX byte ordering).
- Raw data (no header).
- Row by row.
Figure 3 illustrates how to make the above settings in Photoshop.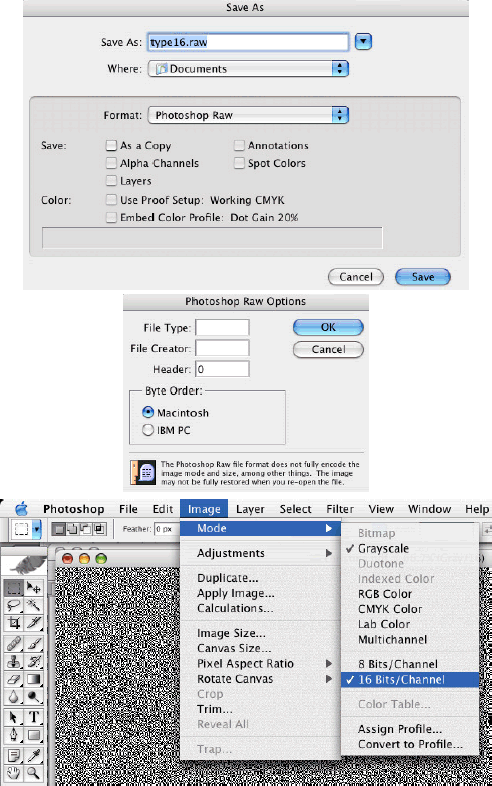
Figure 3 Saving threshold files in Photoshop
Figure 4 illustrates the cell ordering of the threshold file, as reflected by the tile file format requirements. In short the ordering is left‐to‐right, top‐to‐bottom.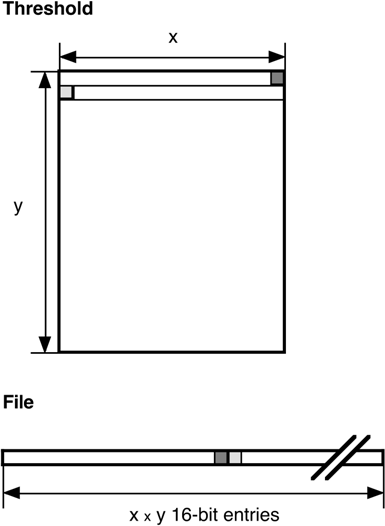
Figure 4 The orientation of the threshold tile vs. the tile file.
Things to consider
A threshold screen, whilst relatively easy to produce, should have linear screening properties. This means that tint value A should have roughly the same number of instances as tint value B (where A and B are any tint value). Similarly there should be no instances that do not occur in the threshold array. Whilst in smaller the threshold arrays, this can be roughly approximated (there may be less than 65536 values), at larger screen sizes, failing to provide values results in gradation in the screen that may appear unpleasant.
Implementing a type 16 halftone screen in the RIP
This description assumes you have a tile file, nuscreen.raw. Its suffix shows that it is a Photoshop header‐less 16‐bit file (saved with "Macintosh byte ordering"). The tile is 400 entries by 400 entries.
Location of the screen tile
Once the tile files have already been created, they need to be stored in the Harlequin RIP directory hierarchy. Whilst there is no requirement, it is typical to put OEM‐specific the threshold arrays in the OEM's directory within the SW directory. In the case of the following examples, the OEM name will be OEMName. For simplicity, the tiles are put in a sub‐directory called Tiles. Therefore the tile file is placed in:
/SW/OEMName/Tiles/
Adding sf.ps information
There are two ways in which screening is controlled; with the PostScript Language or with the Classic RIP GUI. You should edit the sf.ps file for control in the PostScript language, and edit the Screen Names file (see below) for control in the Classic RIP GUI.
To add your screen to the list of available screens, you must edit the sf.ps file.
1.Open the file:
/SW/Screens/sf.ps2. Append the halftone definition after the last entry:
/TestSimpleType16
	<<
		/HalftoneType 16
		/Height 400
		/Width 400
		/Thresholds (OEMName/Tiles/nuscreen.raw) (r) file
	>> def
Adding ScreenName information
You must also edit the ScreenNames file:
- Open the file:
/SW/Config/ScreenNames2. Append your ScreenName definition after the last entry:
<<
	/InternalName (TestSimpleType16)
	/ExternalName (TestSimpleType16)
	/Type (Threshold)
	/Enabled true
	/DefaultValues
	[
	]
>>
Type 5 halftone
The method of implementing a type 5 halftone is almost identical to a single type 16 halftone. You will need five threshold tiles. For simplicity, it might be useful to reference each screen by its colorant.
The substantial change is within the sf.ps file:
/TestSimpleType5
	<<
		/HalftoneType 5
		/Cyan
		<<
			/HalftoneType 16
			/Height 400
			/Width 400
			/Thresholds (OEMName/Tiles/cyan.raw) (r) file
		>>
		/Magenta
		<<
			/HalftoneType 16
			/Height 400
			/Width 400
			/Thresholds (OEMName/Tiles/magenta.raw) (r) file
		>>
		/Yellow
		<<
			/HalftoneType 16
			/Height 400
			/Width 400
			/Thresholds (OEMName/Tiles/yellow.raw) (r) file
		>>
		/Black
		<<
			/HalftoneType 16
			/Height 400
			/Width 400
			/Thresholds (OEMName/Tiles/black.raw) (r) file
		>>
		/Default
		<<
			/HalftoneType 16
			/Height 400
			/Width 400
			/Thresholds (OEMName/Tiles/default.raw) (r) file
	>>
>> def
Encrypting the halftone
The Harlequin RIP supports encrypted halftones. Based on the halftones that we have already created, there are only two additional stages:
- Encrypting the tile files—described in next section, Using HQcrypt.
- Adding the /Encrypt dictionary to the halftone—described following that, in Decrypting the halftone.
Using HQcrypt
The halftone tiles can be encrypted with the same method described for fonts in Technical Note Hqn052 - Font Encryption with HQcrypt. Please note that this allows for encryption ʹper Harlequin RIPʹ or ʹper OEM numberʹ.
The following example uses the generic RIP ID 59, to encrypt the tile file nuscreen.raw on a Windows PC:
type SW\OEMName\Tiles\nuscreen.raw | hqcrypt.exe 59 >
SW\OEMName\Tiles\nuscreen.enc
At this point you should record the size of the newly created file nuscreen.enc in bytes. The size of the file is required for the decryption stage.
Decrypting the halftone
The /Encrypt dictionary needs to be added to the halftone in order to decrypt the newly created threshold tile:
/TestSimpleType16
	<<
		/HalftoneType 16
		/Height 400
		/Width 400
		/Encrypt<<
			/EncryptType 1
			/EncryptLength 320348
		>>
		/Thresholds (OEMName/Tiles/nuscreen.enc) (r) file
	>> def
The /EncryptLength should be the file size of nuscreen.enc. Please note that the size of the encrypted screen may not be the same, even if the same screen is run through hqcrypt with the same encryption ID number.
For type 5 halftones, the /Encrypt dictionary should be attached to the type 16 halftones contained within the type 5 halftone.
Encrypting the RIP's screen caches
An alternative method of encrypting screen threshold data is provided from version 7.1. The /EncryptScreens system parameter can be used to make the RIP produce encrypted screen caches.
The /EncryptScreens system parameter provides the following benefits:
- In‐coming screens to the RIP will always maintain at least the level of encryption they currently have.
- The RIP can change the lock on screens to a more appropriate level.
- Allows unencrypted screens to be encrypted and the resulting screen caches can be safely shared.
For example, an ExtraStart file (which is run at RIP start‐up), containing the following example can be used to make the RIP encrypt any new screen caches it creates, yet allow them to be used in any Harlequin RIP:
<<
	/EncryptScreens 1
	/Password 0
>> setsystemparams
Alternatively, the following example could be used to encrypt the screen caches in such a way that they can only be used by RIPs with the same OEM number as the encrypting RIP:
<<
	/EncryptScreens 2
	/Password 0
>> setsystemparams
This means that the distribution of the original, raw threshold screen tiles is avoided because the encrypted screen cache can be used.
The following levels of encryption are provided:
- EncryptScreens set to 0 (un‐encrypted) caches are always locked for use in the RIP which created them.
- EncryptScreens set to 1, encrypts with the generic number (0x3b).
- EncryptScreens set to 2, encrypts with the customer (OEM) number.
- EncryptScreens set to 3, encrypts with the dongle security number.
Note: The only difference when making and using encrypted screens is the number used in the encryption. For example, 2 is used to encrypt to the OEM number and 3 is used to encrypt with the dongle security number.
Note: This method can also be used to protect Harlequin Precision Screens (HPS) or other threshold screens.
When encrypted the threshold arrays are used, the RIP will automatically encrypt the screen caches. When this happens the way the threshold array were originally encrypted depicts the minimum level of screen cache encryption:
Table 1 Screen encryption levels
Threshold arrays encrypted with | Minimum screen cache encryption level |
Nothing (unencrypted) | 0 |
59 (Generic RIP id) | 1 |
OEM number | 2 |
Dongle number | 3 |
If the specified system parameter value is higher than the minimum screen cache encryption level determined from the threshold array, the system parameter value is used.
Thus, if threshold screen data is encrypted against an OEM number, the generated screen caches will also be encrypted at least against the OEM number and can be used with any Harlequin RIP with that customer number.
Examples
The following example code shows how to create and distribute encrypted screen caches, tied to the RIP's OEM number, from raw threshold data:
	%....
	%%EndComments

	% Ensure that no screen caches exist for this halftone name
	%
	(%os%/Screens/MYNAMEenc/*)
	{ mark 1 index { deletefile }stopped {
			cleartomark
			(Warning - Failed to delete cache file )print print (\n)print
		}{
			cleartomark
			(Comment - Deleted cache file )print print (\n)print
		}ifelse
	} 512 string filenameforall

	%
	% Declare the original un-encrypted threshold halftone dictionary
	%
	/MYNAMEenc <<
		/HalftoneName /MYNAMEenc
		/HalftoneType 5
		/Cyan <<
			/HalftoneType 16
			/ScreenExtraGrays false
			/Width 4
			/Height 4
			/Thresholds <
				0001 1112 3334 6667
				2223 4445 7778 AAAB
				5556 8889 BBBC DDDE
				999A CCCD EEEF FFFF
				> 32 () /SubFileDecode filter
		>>
		/Magenta <<
			/HalftoneType 16
			/ScreenExtraGrays false
			/Width 4
			/Height 4
			/Thresholds <
				FFFF EEEF CCCD 999A
				DDDE BBBC 8889 5556
				AAAB 7778 4445 2223
				6667 3334 1112 0001
				> 32 () /SubFileDecode filter
		>>
		/Yellow <<
			/HalftoneType 16
			/ScreenExtraGrays false
			/Width 4
			/Height 4
			/Thresholds <
				999A 5556 2223 0001
				CCCD 8889 4445 1112
				EEEF BBBC 7778 3334
				FFFF DDDE AAAB 6667
				> 32 () /SubFileDecode filter
		>>
		/Black <<
			/HalftoneType 16
			/ScreenExtraGrays false
			/Width 4
			/Height 4
			/Thresholds <
				6667 AAAB DDDE FFFF
				3334 7778 BBBC EEEF
				1112 4445 8889 CCCD
				0001 2223 5556 999A
				> 32 () /SubFileDecode filter
		>>
		/Default <<
			/HalftoneType 16
			/ScreenExtraGrays false
			/Width 4
			/Height 4
			/Thresholds <
				999A 5556 2223 0001
				CCCD 8889 4445 1112
				EEEF BBBC 7778 3334
				FFFF DDDE AAAB 6667
				> 32 () /SubFileDecode filter
		>>
	>> def

	%
	% Set up a suitable page device
	%
	<<
		/HWResolution [ 300 300 ]
		/PageSize [ 72 72 ]
		/InterleavingStyle 3
		/ProcessColorModel /DeviceCMYK
		/SeparationDetails
		<<
			/SeparationStyle 4
			/CompositeColorNames [ /Cyan /Magenta /Yellow /Black ]
			/CompositeOrder [ /Cyan /Magenta /Yellow /Black ]
		>>
		/ValuesPerComponent 2
	>> setpagedevice

	%
	% Ensure no halftone override, e.g. from a page setup
	%
	<< /OverrideSpotFunctionName null
		/Passwword 0
	>> setsystemparams

	%
	% Enable OEM number encryption
	%
	<< /EncryptScreens 2
		/Passwword 0
	>> setsystemparams

	%
	% Install the halftone and use it
	%

	MYNAMEenc sethalftone
	.5 .5 .5 .5 setcmykcolor clippath fill
	showpage
	%
	% Disable encryption again
	%
	<< /EncryptScreens 0
		/Passwword 0
	>> setsystemparams

	% The screen cache files should now be present within
	% SW/Screens/MYNAMEenc/ in folders named Black, Cyan, Default,
	% Magenta and Yellow. In the case of these 4x4 examples, the files
    % will be named 04000400.001. That name will differ for
	% thresholds with different dimensions.
To use these screens in another RIP (with the same customer number), copy all the screen cache folders under SW/Screens/MYNAMEenc to the other RIP, then add the following code to the other RIPʹs SW/Screens/sf.ps file:
	% preamble...
	%
	/MYNAMEenc <<
		/HalftoneName /MYNAMEenc
		/HalftoneType 5
		/Cyan <<
			/HalftoneType 16
			/ScreenExtraGrays false
			/Width 4
			/Height 4
			/Thresholds (%invalidfile) (r) file
		>>
		/Magenta <<
			/HalftoneType 16
			/ScreenExtraGrays false
			/Width 4
			/Height 4
			/Thresholds (%invalidfile) (r) file
		>>
		/Yellow <<
			/HalftoneType 16
			/ScreenExtraGrays false
			/Width 4
			/Height 4
			/Thresholds (%invalidfile) (r) file
		>>
		/Black <<
			/HalftoneType 16
			/ScreenExtraGrays false
			/Width 4
			/Height 4
			/Thresholds (%invalidfile) (r) file
		>>
		/Default <<
			/HalftoneType 16
			/ScreenExtraGrays false
			/Width 4
			/Height 4
			/Thresholds (%invalidfile) (r) file
		>>
	>> def
Please note that (%invalidfile) (r) file is used in the RIP using distributed screen caches to define the threshold in the normal way, but without actually providing any threshold data. The RIP will find the correct screen caches from the halftone definition, so it actually never needs to refer to the /Thresholds file.
What this does is provided a “dummy” file to satisfy the syntactic/semantic demands of the PostScript language code, without wasting any resources. If the RIP cannot find the caches (for example, because they have not been installed properly), the use of %invalidfile helps to ensure a predictable ioerror is generated.
For a simple demonstration of the screen caches in action in another RIP, run the following PostScript language job:
%!PS
%....
%%EndComments

%
% Set up a suitable page device
%
<<
  /HWResolution [ 300 300 ]
  /PageSize [ 72 72 ]
  /InterleavingStyle 3
  /ProcessColorModel /DeviceCMYK
  /SeparationDetails <<
    /SeparationStyle 4
    /CompositeColorNames [ /Cyan /Magenta /Yellow /Black ]
    /CompositeOrder [ /Cyan /Magenta /Yellow /Black ]
  >>
  /ValuesPerComponent 2
  /DefaultScreenName /MYNAMEenc
>> setpagedevice

% Ensure no halftone override, e.g. from a page setup
%
% Note that /OverrideSpotFunctionName requires a string
% in RIPs prior to 7.2. Supplying a name such as /MYNAMEenc
% will cause a rangecheck error in 7.1.
% Failing to add /MYNAMEenc to SW/Screens/sf.ps will also
% cause a rangecheck error, so beware.
%
<<
  /OverrideSpotFunctionName (MYNAMEenc)
  /Password 0
>> setsystemparams

.5 .5 .5 .5 setcmykcolor clippath fill showpage
To make the screens visible in the RIP GUI, add the following new entry to the array of dictionaries in the SW/Config/Screen Names file, or the relevant plugin‐specific Screen Names file, as described in Screen Names specific to a plugin.
<<
  /InternalName (MYNAMEenc)
  /ExternalName (HQN061 Encrypted)
  /Type (Threshold)
  /Enabled true
  /DefaultValues [ ]
>>
Changes after installation
After the halftone has been installed and used in the Harlequin RIP, you may want to change the threshold information. This can be done, although the cached screen needs to be deleted to allow the Harlequin RIP to create a fresh version with the new threshold changes, as described in Screens vs. screen caches below.
In the case of the TestSimpleType16 halftone screen, delete the directory:
SW/Screens/TestSimpleType16
For another screen, delete the associated directory. This will be recreated by the Harlequin RIP with a new screen cache when it is next run. If you change an encrypted tile, make sure you change the length referenced by /EncryptLength. As noted above, this number will almost always be different even if the screen and encryption ID remain the same.
Screens vs. screen caches
When you change a type 16 or type 5 halftone screen, you must delete the associated screen caches. The location of screens vs. screen caches are described in Figure 5 below.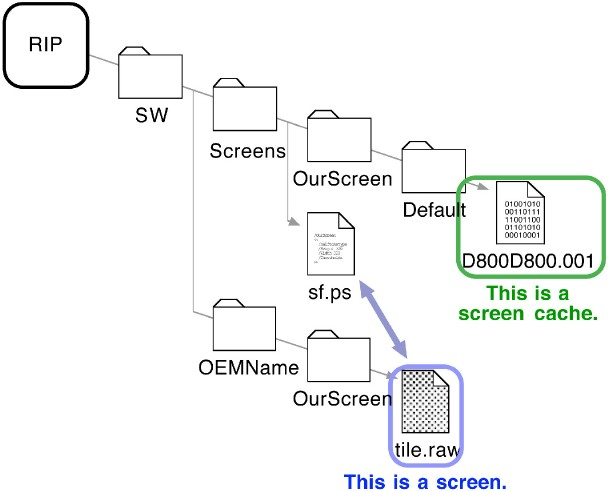
Figure 5 Screens vs. screen caches
You should never have to touch the screen caches explicitly. Screen caches are generated internally for use in the RIP only.
Table 2 Screens vs. screen caches
| Screen Caches |
Defined in the PostScript language. Headerless threshold information, represented in 16-bit, Mac-byte-ordered values | Proprietary Global Graphics format |
Read by Photoshop and other image editing packages | Can not be read by any program other than a Harlequin RIP |
Can be shared between installations | Can not be shared between installations |
Global Graphics' HQX Encryption through /Encrypt | Screen cache is either:
|
Can be placed and linked in any directory (generally best not in the | Can only be found in the |
Whilst screens and screen caches are similarly named, they are completely different in structure and purpose, as illustrated in Table 2.
