
Engineer Pane
Overview
The Engineer Pane contains settings that are typically set once during an installation and are not expected to change.
You must enter a four-digit number to access the Engineer Pane. This PIN is determined by your Device Configuration.
When you enable the Engineer Pane, you can access it until you restart the application.
Press Apply to register any changes, which uploads updated config files to each RIP Server; SPC then restarts and reconnects to each Harlequin Direct server.

RIP Servers
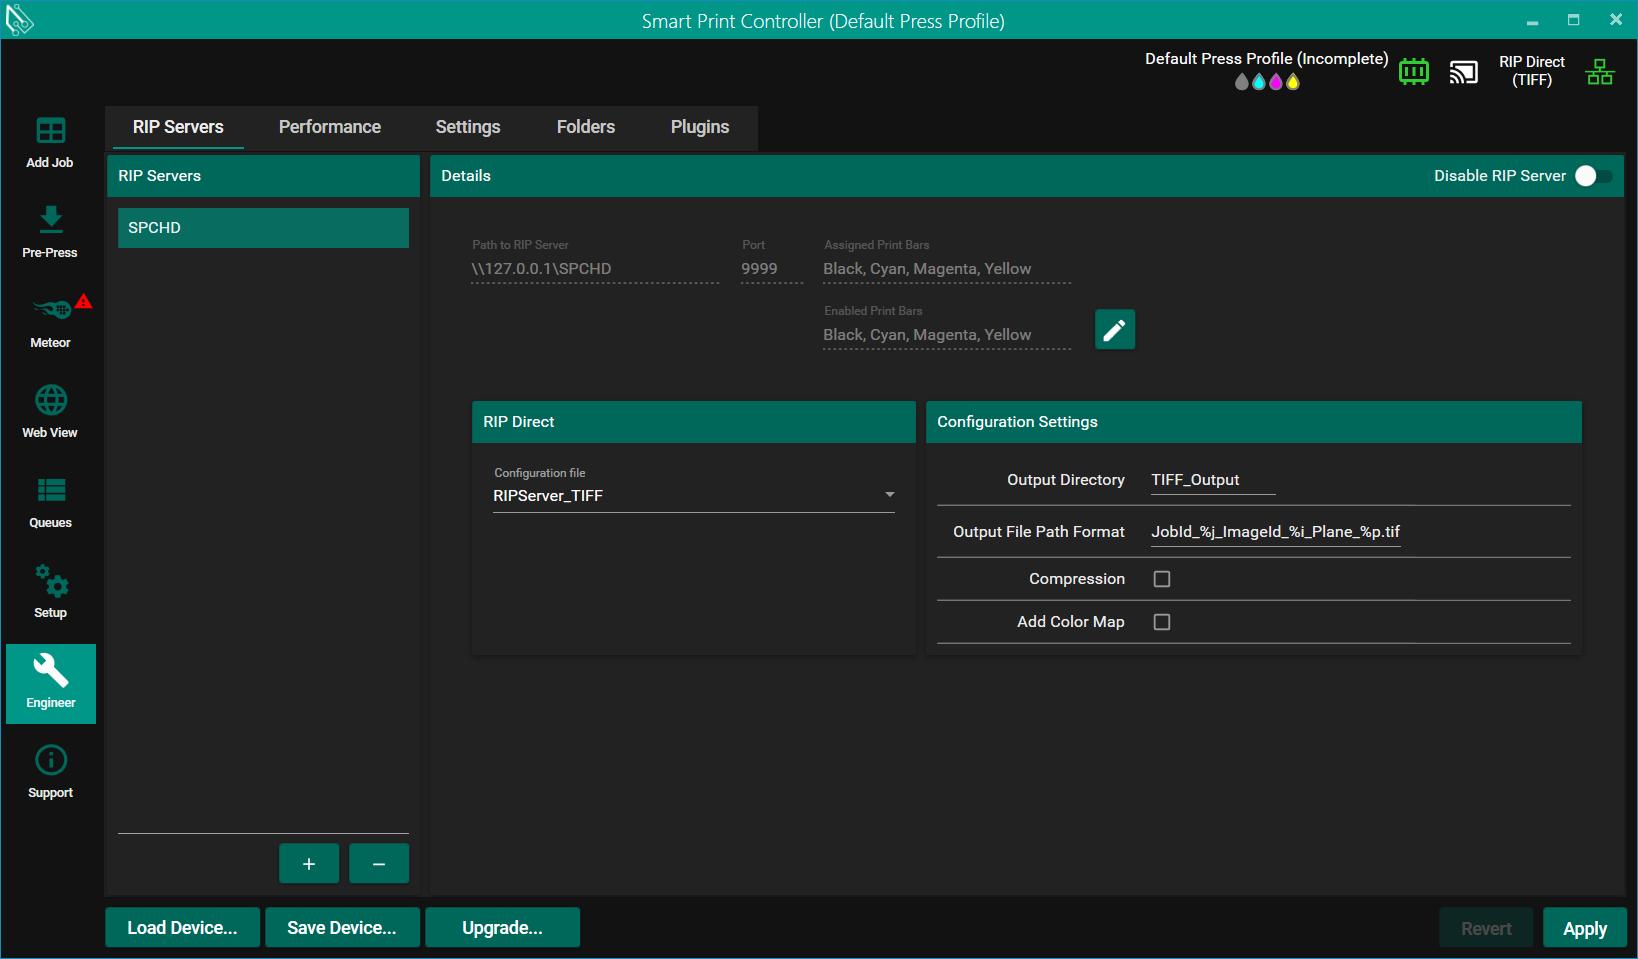
Use the RIP Servers tab configure your RIP Server(s).
RIP Servers
The list displays the currently configured servers.
Use the + or - button to add or remove servers.
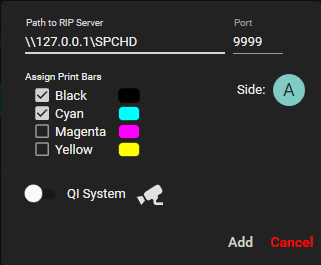
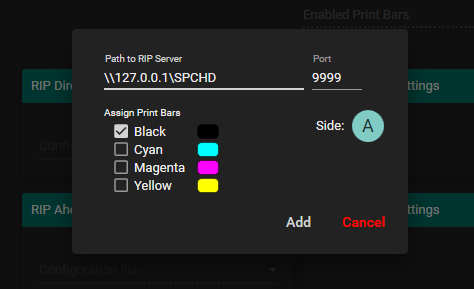
To add a server and its associated print bars, you require the following data:
Path to RIP Server
Before printing can occur, you must register at least one Harlequin Direct server with SPC.
The server location must contain the UNC path and share name of the folder that contains the Harlequin Direct executable. This must be of the form:
\\127.0.0.1\SPCHD
This file share must be readable and writable by the user running SPC.
Port
Use this base port number to communicate with the RIP Server.
Harlequin Direct requires that this port and the three port numbers below it (for example, 9999 to 9996) are open.
You may need to adjust network firewall policies.
Assign Print Bars
The Device Configuration imports the list of print bars.
Use the collection of checkboxes to assign one or more print bars to the RIP Server.
Side
This option is only available if you are configuring a duplex press.
Click the button to select either Side A or Side B.
QI System
In the Device Configuration, if you enable support for QI Systems, the QI System toggle displays. A server set as a QI System is used exclusively for quality inspection; no other print bars can be assigned to it. Only one QI System per side is allowed.
Details
This section provides a non-editable view of the parameters set for the selected configured RIP Servers.
In the Details Header there is a Disable RIP Server toggle that allows the selected RIP Server to be disabled. On registering a RIP Server disabled, it is effectively treated as though it has been deleted although it is still known about to SPC and can be re-enabled.
Enable Print Bars
To edit the enabled print bars, click the pencil icon next to the job, which opens a dialog with a collection of checkboxes that allow you to enabled one or more print bars on the RIP Server. Confirming your selection will upload your settings to the server. A print bar that is disabled is effectively treated as though it's not on the server although it is still known about to SPC and can be re-enabled.

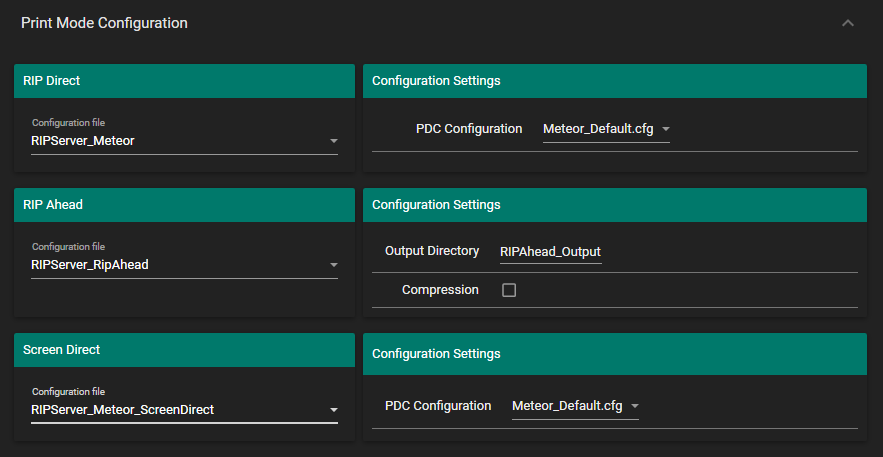
Print Mode Configuration
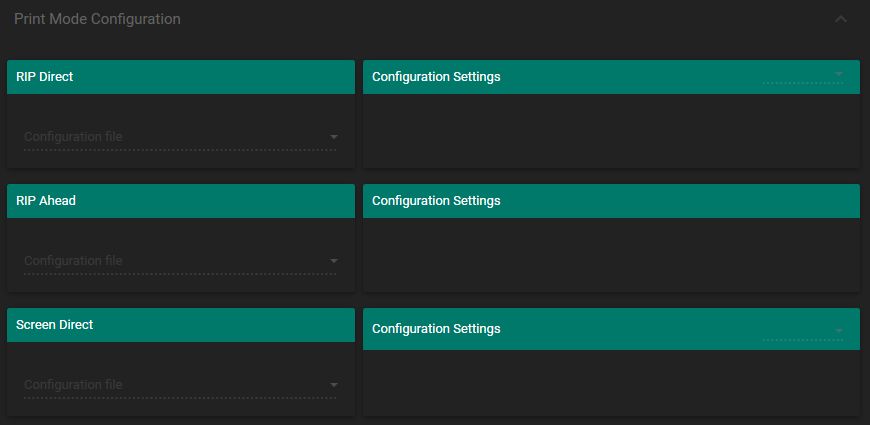
RIP Direct
This dropdown list allows you to select which configuration files to use.
The RIP Server configuration defines the number of Harlequin RIPs to use and their associated PostScript configuration, along with settings for ScreenPro Direct.
SPC's configuration files for RIP Direct reside in the following folder:
C:\ProgramData\Smart Print Controller\ConfigFiles\RipDirect\
If SPC is running, you must restart it to detect additional configurations added to this folder.
The additional Configuration Settings for the output device are only available for certain Harlequin Direct configurations.
Configuration settings for TIFF output
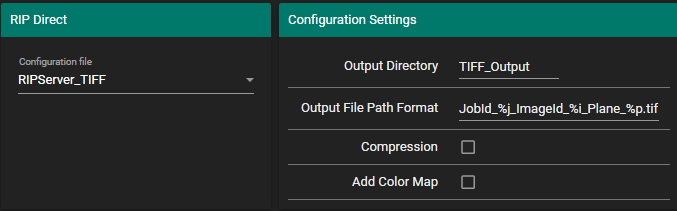
When printing to TIFF, the following configuration settings are available:
- Output Directory specifies a subfolder within the shared RIP Server folder for the TIFF files to be written.
Output File Path Format specifies the file path-naming scheme. Harlequin Direct determines valid format specifiers, which follow:
TEXT%j - JobId %i - ImageId %p - PlaneId %J - JobName %P - PageNumber %c - ColorantName %b - Bpp %x - XDpi %y - YDpi %f - Filename of job without extension (Spaces replaced with underscores)- To use 'PackBits', enable Compression.
- To set the Photometric interpretation as "Palette" and cause an RGB color map to be added into the TIFF tag, enable Add Color Map.
Configuration settings for the Virtual Press plugin
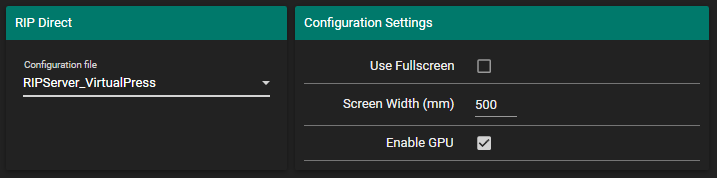
When printing to the Virtual Press plugin, the following configuration settings are available:
- Use Fullscreen specifies whether the Virtual Press plugin is displayed as a Window or in Fullscreen.
- Screen Width (mm) specifies the width of the screen the Virtual Press will be displayed on. This is used to determine how much of the screen the page takes up and in the calculation of the movement of the page across the screen.
- Enable GPU specifies whether to use the GPU or CPU when rendering the pages in the Virtual Press.
RIP Ahead and Screen Direct
RIP Ahead and Screen Direct only appear if you enable the Device Configuration's Offline Mode.
SPC's configuration files for these modes reside within the following folders, respectively:
C:\ProgramData\Smart Print Controller\ConfigFiles\RipAhead\
C:\ProgramData\Smart Print Controller\
ConfigFiles\ScreenDirect\
If SPC is running, you must restart it to detect additional configurations added to these folders.
Meteor configuration
The Meteor Pane is only visible if a Harlequin Direct configuration is present that supports the Meteor output device.
SPC's Meteor configuration files reside in the following folder:
C:\ProgramData\Smart Print Controller\ConfigFiles\Meteor
If SPC is running, you must restart it to detect additional configurations added to this folder.
Device Configurations
Device Configurations are initially created using Smart Device Configurator and contain information about the physical printer the system is connected to, including the number of print bars, duplex, resolution support, and many other features.
When a configuration is imported with the Load Device button, the list of servers will be reset and the application settings will be updated.
In SPC's evaluation version, the RIP Server is installed at \\127.0.0.1\SPCHD.
You can also save a new configuration (Save Device) based on your current SPC state. This allows further changes to the configuration to be made (E.g. Changing server paths and ports).
The saved configuration includes the following:
- All settings from the Setup Pane
- All System and Media settings from the Engineer Pane
- All settings from the Settings tab of the Engineer Pane except the OPCUA Endpoint.
- All Smart Media Definitions
- All Streamline Direct models
- All RIP Server JSON template files, and their settings
- All RIP Server PostScript template files
Create multiple SDC files to easily return to different configurations. These can be loaded through the user interface, or provided on the application command line to auto-load on start-up.
The 'Upgrade' button can be used to update the RIP Server JSON template files and plugins from a Device Template created using Smart Device Configurator.
When an SDC file is loaded, your current settings at the point of loading are saved to a backup file inside C:\ProgramData\Smart Print Controller\.
If the SDC file contains Queue Folder paths that do not exist, SPC attempts to create them. If those paths cannot be created, SPC falls back to the default Queue Folders found in Public Documents.
Loading an SDC file overwrites your current server config files and Streamline Direct models, which can be restored by loading the backup file.
You may have to restart the application after loading a Device Configuration to apply some settings.
Performance
Use this tab to configure the settings related to the speed estimation and autotuning of jobs in SmartDFE.
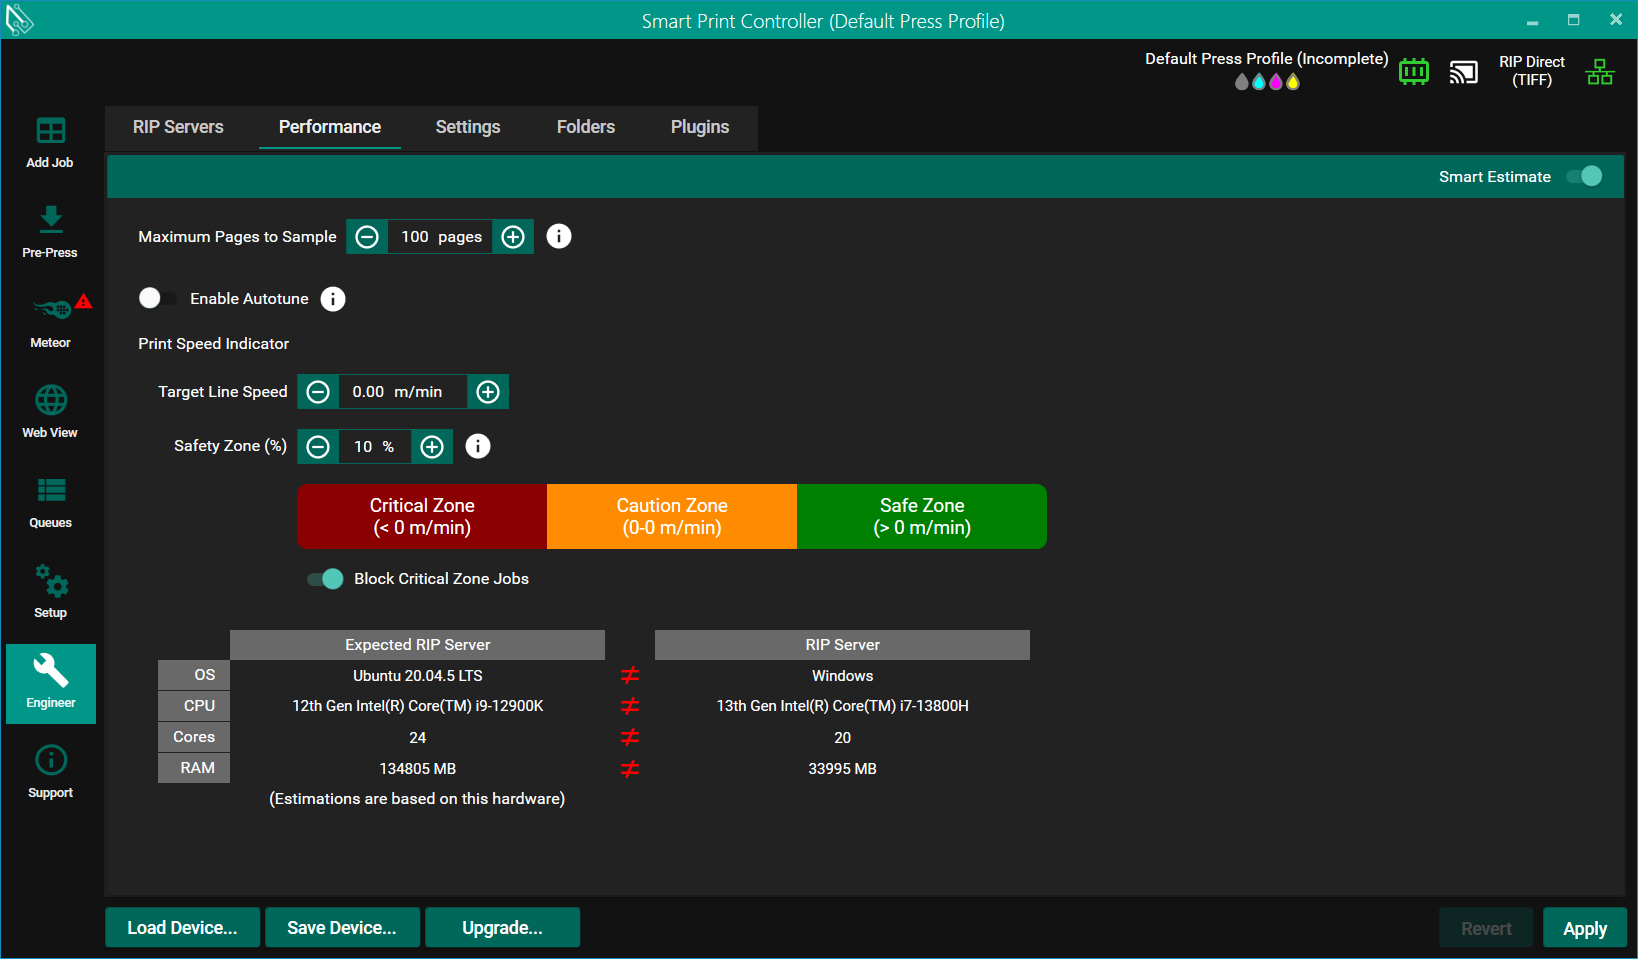
Smart Estimate
This determines whether jobs are given an estimated print speed by Streamline Estimate. If this is disabled, all the other features on this pane will take no effect and will be disabled.
Maximum Pages to Sample
This determines the maximum number of pages to use for estimation. The estimated pages will always start from the middle of the job, expanding outwards. If this value is longer than the number of pages in the job, then the entire job is estimated.
Enable Autotune
This determines whether a Job Optimization takes place. Job Optimization determines if a job's print speed could be improved by optimizing the job structure.
Print Speed Indicator
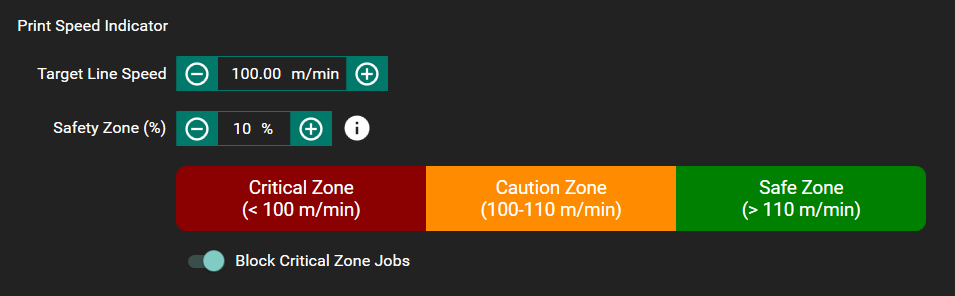
These options relate to the traffic lights that appear on jobs in the Waiting Queue, and the ruling surrounding them.
- Target Line Speed defaults to the value specified in the Device Configuration; increase or decrease the value here.
- The traffic light indicators for jobs in the Waiting Queue are based on the Target Line Speed and the Estimated line speed obtained when Enable Estimation is turned on.
- The Safety Zone is a percentage above the Target Line Speed where Streamline Estimate considers a job's Print Speed Indicator to be Orange. This results in jobs requiring a higher line speed to be considered Green. This value goes from 0% - 50%.
- If your Safety Zone is set to 10%, and your maximum line speed is 70m/min, then Streamline Estimate will only mark a job as Green if it achieves an estimated line speed of at least 77m/min.
- The traffic light thresholds show the speeds at which a job will be marked with a given traffic light color.
- Block Critical Zone Jobs will forbid any job with a Red speed indicator from entering the Print Queue when enabled. This option is enabled by default.
- If this is disabled, the estimated line speed of a job will not be taken into account when determining if that job can be moved to the Print Queue.
- This option is ignored when in RIP Ahead mode.
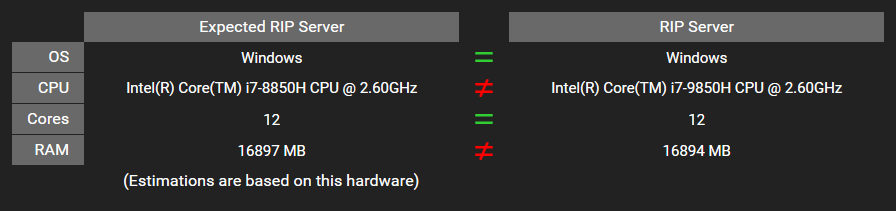
Server Settings
The settings of the Expected Server and the current RIP Server are shown side by side with an indication on whether they match.
The settings compared include:
- The OS.
- The CPU.
- The number of cores.
- The RAM.
Settings
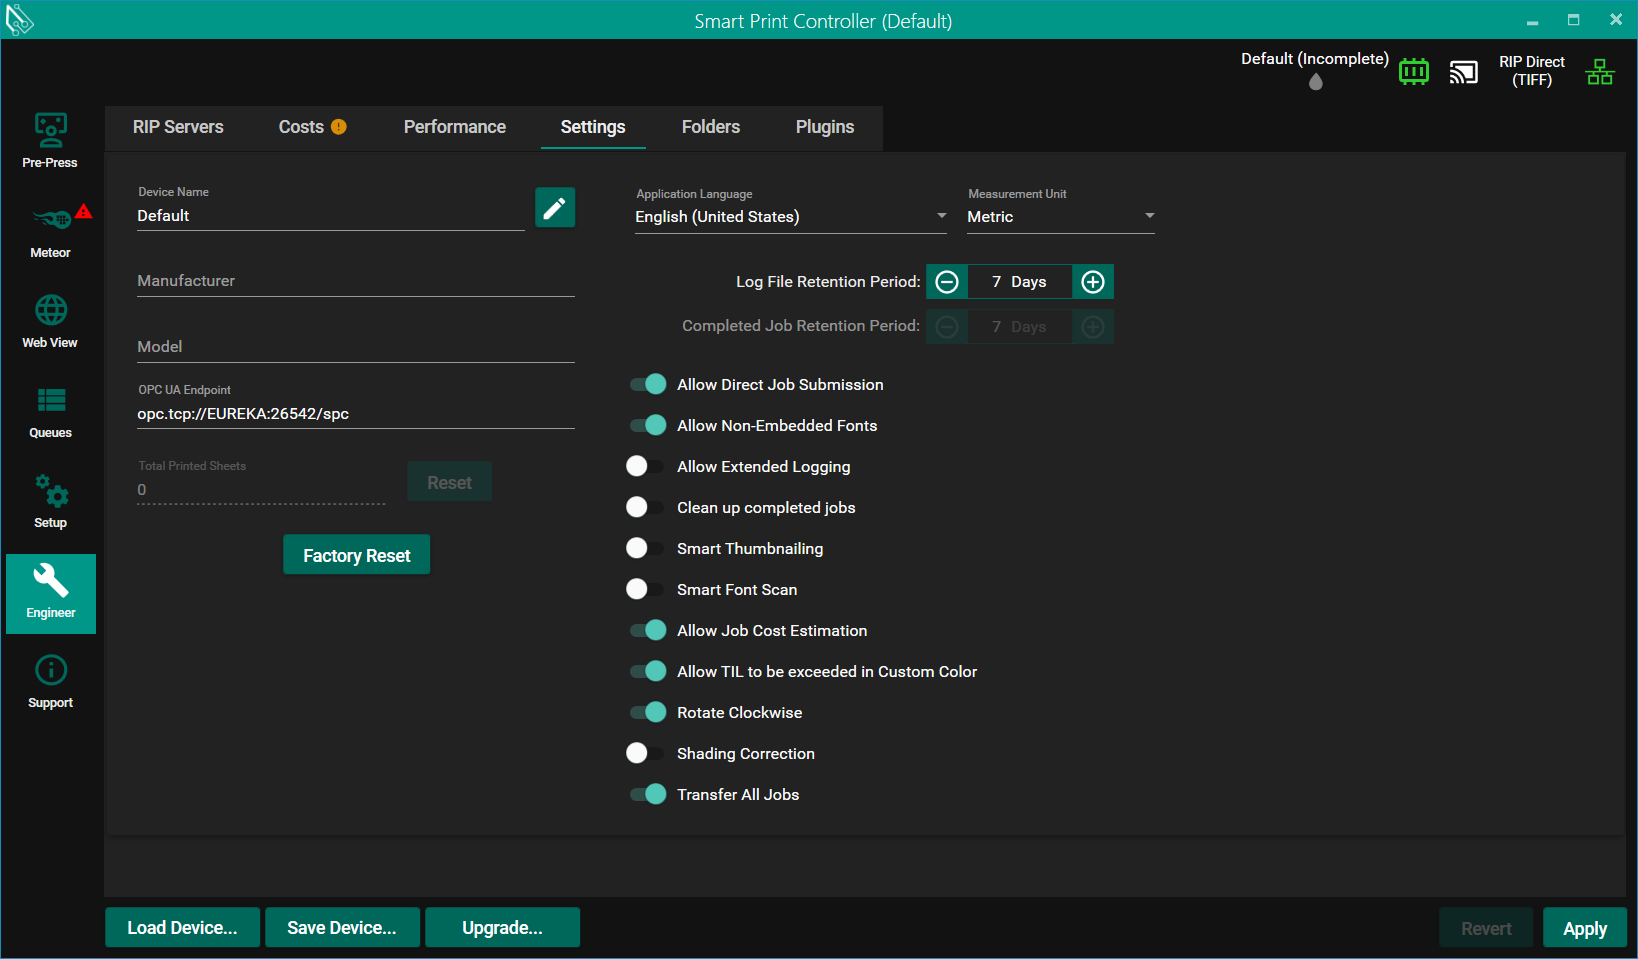
Device Name
This displays the current name of the loaded Device. Clicking the pencil icon allows you to rename the Device. The Device Name must consist of characters that are legal as part of a windows folder path.
Beneath the Device Name are the Manufacturer and Model of the Device. These are read-only fields.
Application Language
This dropdown allows you to select the application language.
The Apply button has no effect on this setting. You must restart the application for any change to take effect.
Measurement Unit
This dropdown allows you to select the measurement unit used in various places across the application.
Allow Direct Job Submission
Enable Direct Job Submission to submit jobs by dropping PDF files onto the Waiting Queue.
When this is disabled, jobs can only be submitted through the Waiting Queue Folder (which requires a .complete file).
The Apply button has no effect on this setting. You must restart the application for any change to take effect.
OPC UA Endpoint
The endpoint for the OPC UA server is displayed, which can be copied for use elsewhere - Required to connect to the Smart Print Controller with an OPC UA client.
For more information see the OPC-UA Interface Guide.
Allow Non-Embedded Fonts
When you enable this feature, you can print jobs with non-embedded fonts; however, a warning displays in the Waiting Queue. When you disable the feature, you cannot print jobs with non-embedded fonts.
Allow Extended Logging
This controls whether:
- pipeline status logs are written into the Harlequin Direct log file for each RIP Server.
- Detailed RIP events are written into the application log.
Note: This feature is intended to aid support issues, and should not be enabled for long periods of time.
Clean Up Completed Jobs
When you enable this feature, jobs in the Completed Queue older than the set Completed Job Retention Period are automatically cleared at application start-up.
Smart Thumbnailing
When you enable this feature, thumbnails will be generated from the most appropriate page of the job rather than always using the first page of the job.
Smart Font Scan
When you enable this feature, scanning the job for missing fonts may be optimized to reduce scan time.
Allow Job Cost Estimation
When you enable this feature, this will reveal the Costs tab in the Engineer pane and enable the ability to estimate the cost of a job from its details dialog. Refer to the Job Cost Estimation section for more information.
Allow TIL to be exceeded in Custom Color
Enabling this feature will allow the user to edit a color in Job Editor in a way that exceeds the Total Ink Limit for the associated Media.
Rotate Clockwise
Enabled by default, this feature
Shading Correction
Enabling this feature will cause the Shading Correction preprocessor to be executed against jobs within the Waiting Queue.
Transfer All Jobs
If enabled, all jobs in the Print Queue are copied to each RIP Server before the first job is submitted for printing.
Completed Job Retention Period
This sets the number of days before jobs in the Completed Queue are automatically deleted when Clean Up Completed Jobs is enabled.
When set to 0, the job files exist only for the current session; restarting the application deletes the previous completed jobs.
Log File Retention Period
This sets the number of days before log files are automatically deleted.
When set to 0, a log file exists only for the current session; restarting the application deletes the previous log.
The Apply button has no effect on this setting. You must restart the application for any change to take effect.
Total Printed Sheets
This field indicates the total number of sheets that the first RIP Server in the servers list has printed.
The count represents printed sheets; therefore, the count does not increment for configurations that output to disk (for example, TIFF and RIP Ahead mode).
To display the Total Printed Sheets count, the application must have an active connection to the RIP Server and no active print run. If there is no active connection, the count reports "Unknown".
To reset the Total Printed Sheets count, the application must have an active connection to the RIP Server and no active print run. Outside of these conditions, the Reset button is disabled.
Factory Reset
Use with care: Deletes all jobs, media, and application state, bringing back the application to a 'factory state'.
We recommend backing up the application state using a device configuration, and exporting any important job queues.
Folders
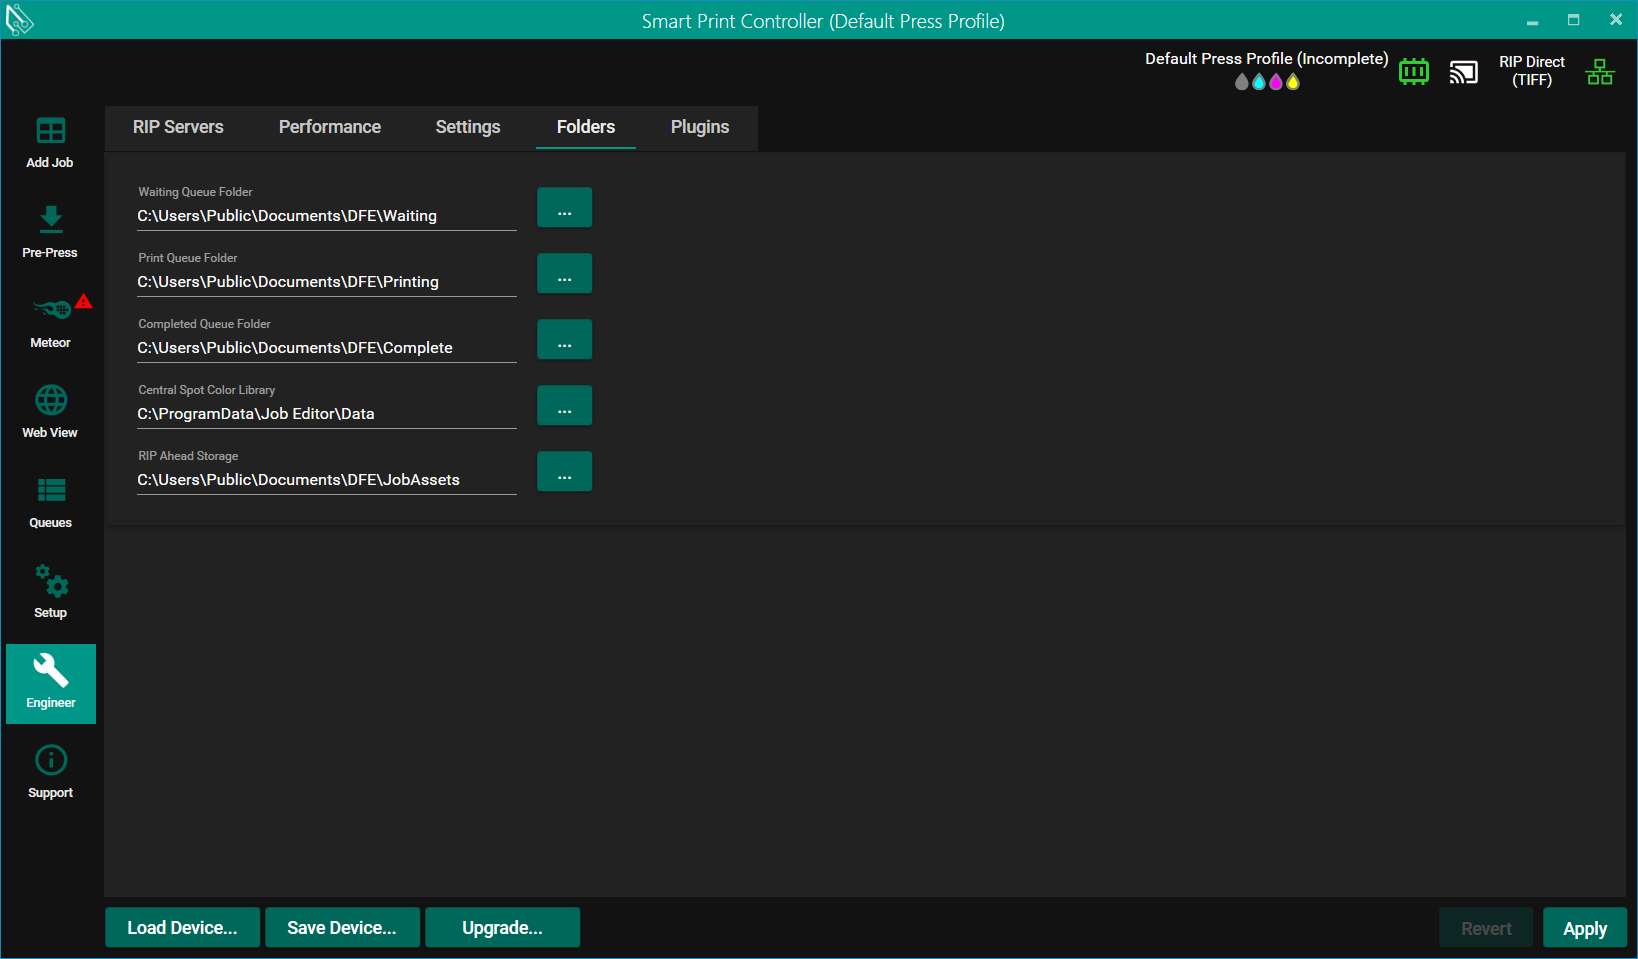
Waiting Queue Folder
SPC uses this folder to store the jobs in its Waiting Queue. If you change the folder while jobs are already in the Waiting Queue, it includes the jobs already in the queue as well as jobs in the Waiting Queue Folder.
This is also the folder used for Direct Job Submission.
If the Waiting Queue is to be visible from a different machine this field must be a fully qualified UNC path (e.g. \\MyPcName\Waiting), and the Waiting folder must be shared with appropriate permission to allow access.
Print Queue Folder
This folder is used internally by the Smart Print Controller and would typically never need to be changed
SPC uses this folder to store the jobs in its Print Queue.
Completed Queue Folder
This folder is used internally by the Smart Print Controller and would typically never need to be changed
SPC uses this folder to store the jobs in its Completed Queue.
Central Spot Color Library
SPC uses this folder as the designated location for the most recent color data for all inks in the centralized libraries.
RIP Ahead Storage
SPC uses this folder as the location for the resources that allow 'RIP Ahead' to be applied to jobs.
Plugins
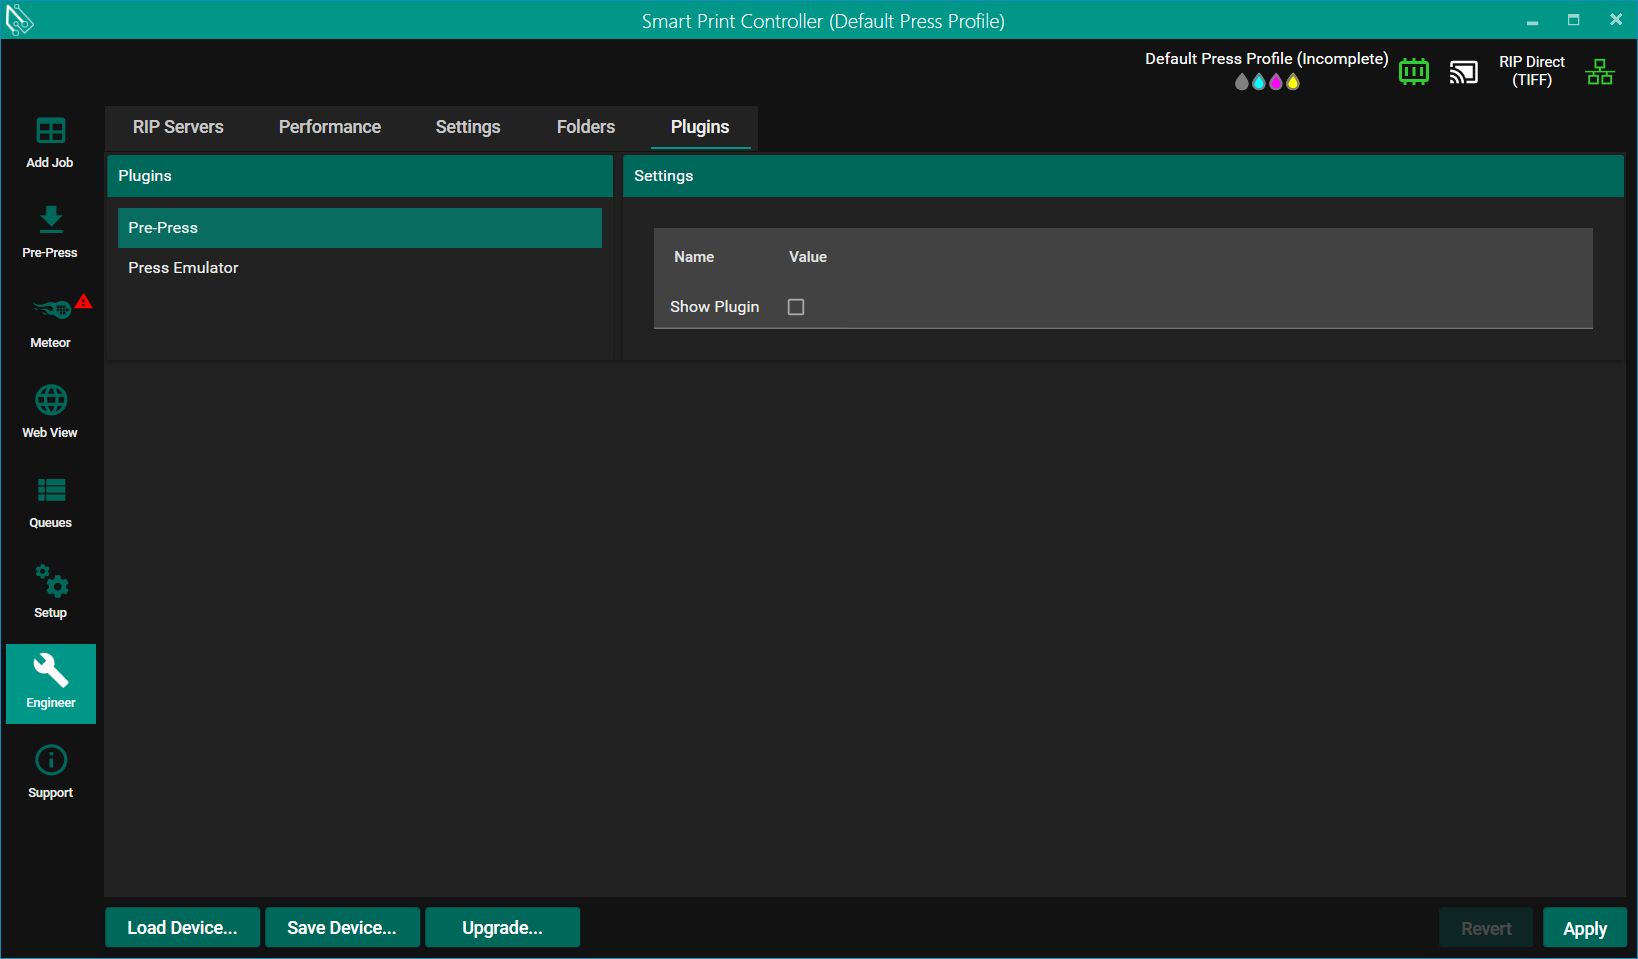
The Plugins tab provides access to any user-modifiable settings exposed by the installed UI plugins.