
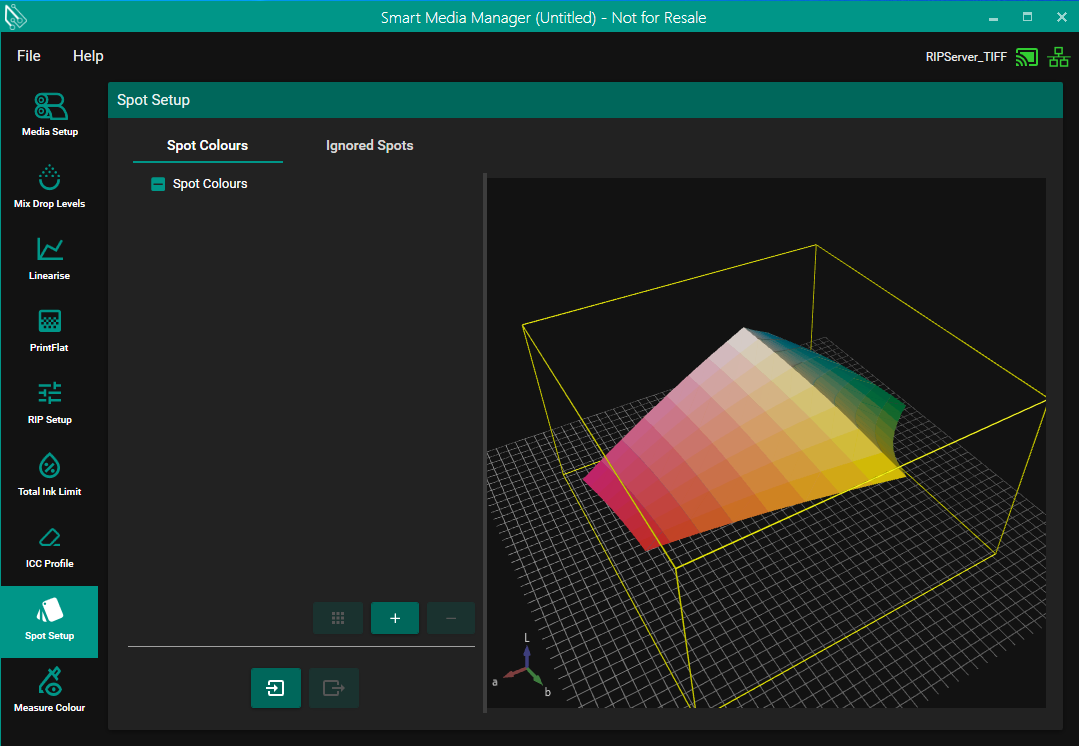
Spot Colors
The Spot Colors panel allows you to manage a range of spot colors, including traditional options like Pantone, as well as technical separations such as metallic inks, white underlays, and other specialty colors.
Settings added to the spot colour lists applies to all jobs printed using the selected media, affecting how spot colors are processed, displayed, and printed.
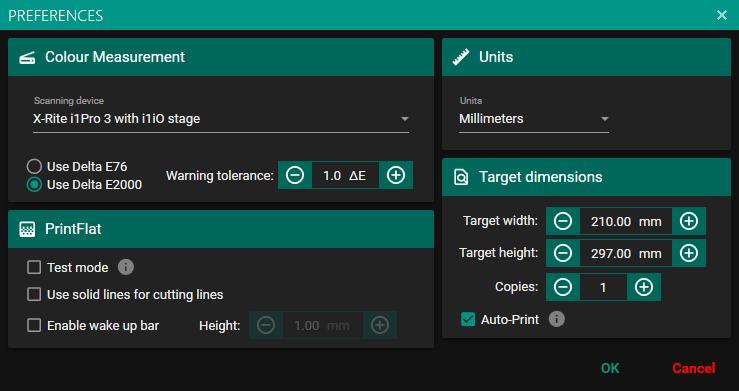
Preferences (File menu)
You can adjust your preferences from the File menu. Here, you can choose whether Delta E calculations use the CIE 1976 or CIE 2000 standard, and set the tolerance level that determines when an out-of-gamut warning is triggered.
Override Spot Colours (Spot Colors)
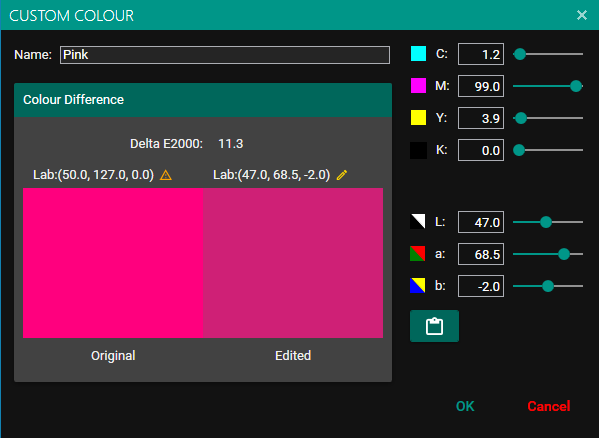
To add a spot color, click the "+" button to open the Custom Color window.
This window displays the mapped in-gamut color along with the Delta E value showing the color difference. You can manually adjust the color by editing the Lab values or using the CMYK sliders (or CMYKOV sliders if an appropriate ECG profile is available).
To remove a spot color, click the "–" button. A warning message will appear to confirm the deletion.
Once a spot color has been added you can right click on it to bring up some more options. These include renaming the color, deleting the color, replacing the color with an in-gamut color (if the spot isn’t in gamut) and changing the color. You can also generate a Spot Variation Chart which is explained below.
Custom Color
Changing a color will bring up the same dialog as adding a spot color but it allows you to change its name and values. If the spot color was originally added with Lab values the original color will show the values of the spot color when it was first added, if not it will sure the values of the color before being edited. A warning triangle will be shown if the color is out of gamut and a pencil icon will be shown if the color has been edited.
On adding or changing a Lab color to be out of gamut you will be first be shown a dialog that will tell you how far out of gamut the color is and will tell you it will be replaced with an in gamut device color if accepted.
Import Spot Colors
To import a list of spot colors from a .tcb or .cxf file, click the "Import" button. This opens the "Import Spot Colors" dialog, where you can browse for the file and select the specific colors you wish to add.
Once imported, all spot colors from the TCB or CXF file will be displayed in a list, as shown below. Any out-of-gamut colors are marked with a warning triangle. Hovering over the triangle displays the Delta E value, indicating how far the color is from the printable gamut.
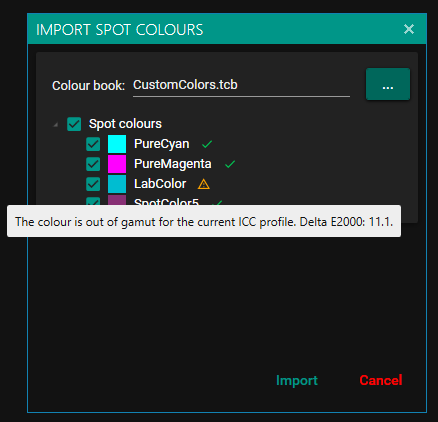
All selected colors are imported, any out-of-gamut colors are brought in gamut and any Lab colors are converted to be device colors.
Right-clicking on a selected color provides several options: “Rename Color,” “Change Color,” “Replace with In-Gamut Color,” or “Delete Color.”
To export your spot colors as a .tcb file, simply click on "Export TCB."
Ignored Spots
This pane lets you specify spot colors that should be excluded from printing—for example, technical spot colors such as dielines that are used for layout purposes only.
.png?inst-v=1d5c94fb-679c-4fbe-98c7-f8227f51afc0)
Click the “+” button in the Ignored Spot Colors section and enter the spot color name.
To Remove a Spot Color from the Ignore List: Select the spot color you wish to remove, then click the “–” button.
Spot Variations Chart

This tool offers a structured method for printing technicians to fine-tune spot colors with precision. By following the guided steps, users can achieve accurate color adjustments and improve overall print quality.
The process begins by printing a reference patch of the original spot color, along with a series of adjacent patches that incorporate subtle variations of cyan, magenta, or yellow process inks. These variations help simulate alternative ink mixes.
The technician compares the printed patches to the target color reference. Once the closest match is identified, the spot color is adjusted to reflect the corresponding CMYK values of the selected patch.
Users can fine-tune the mix by adding or subtracting up to three inks from an extended gamut ink set—excluding black—for greater flexibility in color correction.
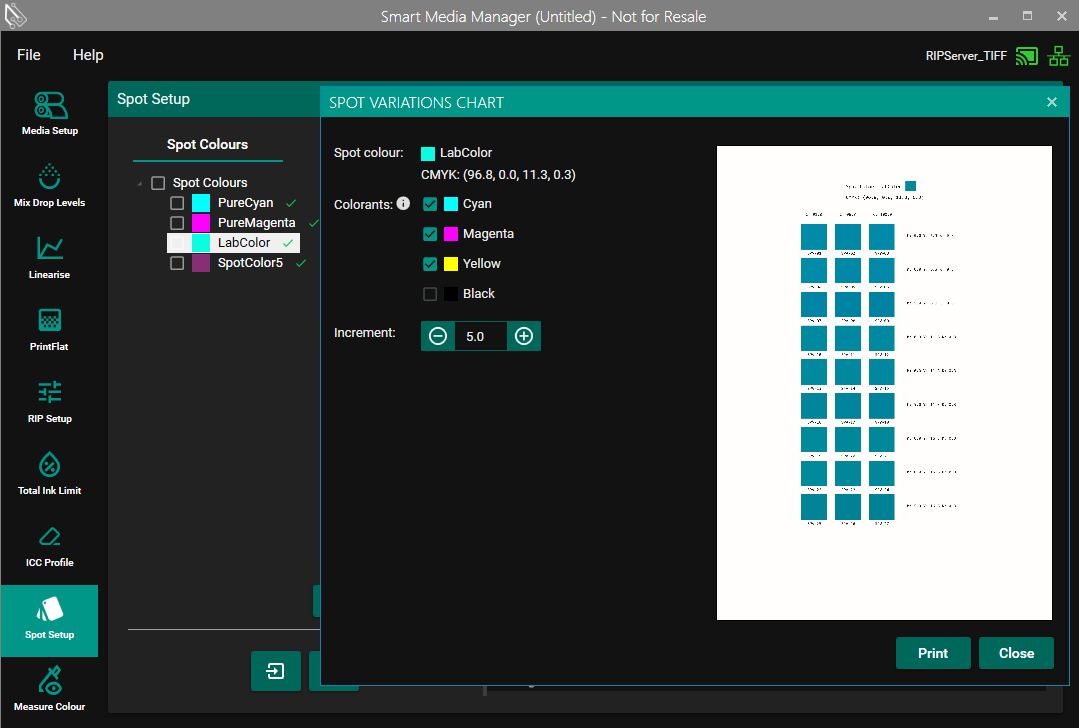
Select any three colors from the list to generate a preview of the color variation patches that will be printed, based on your chosen parameters.
Increment:
Default is 5%, with adjustable steps as small as 0.1% (one decimal place) for fine control.
Once you're ready, click Print to send the PDF directly to the SPC’s waiting queue.